
One-Pan Sticky Teriyaki Chicken Fried Rice – Easy, Delicious & Done in 30 Minutes
Table of Contents
Okay, picture this — it’s a Wednesday evening, you’ve got leftover rice sitting in the fridge, a pack of chicken thighs, and about 30 minutes before everyone starts asking what’s for dinner.
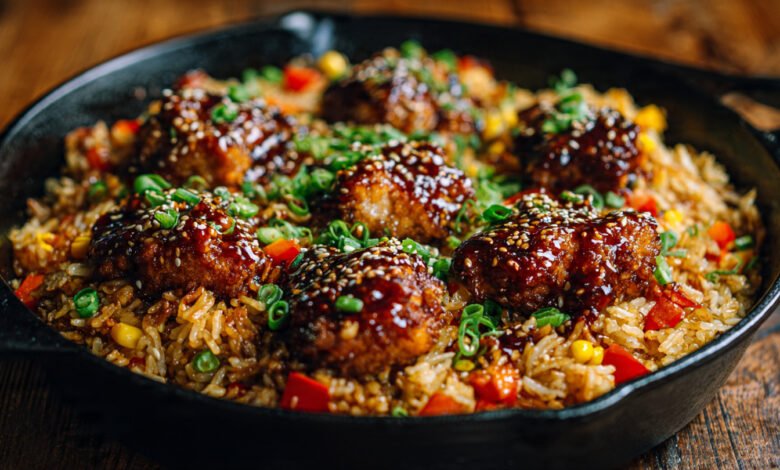
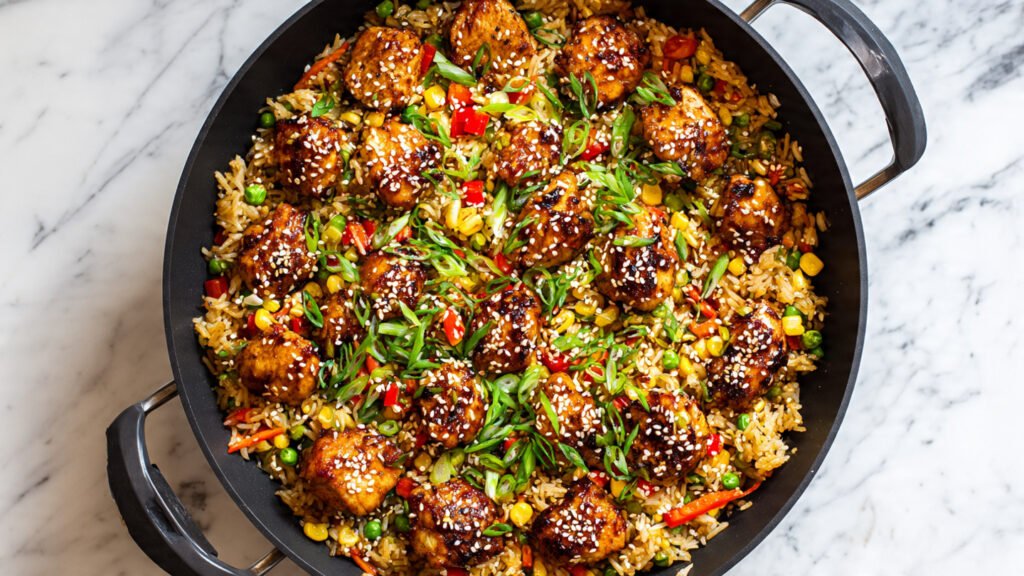
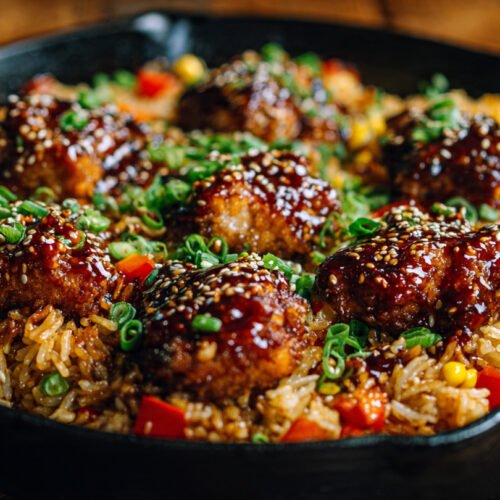
That’s exactly the moment when this One-Pan Sticky Teriyaki Chicken Fried Rice becomes your best friend in the kitchen. Everything — the chicken, the eggs, the veggies, the rice, and that gorgeous sticky teriyaki glaze — all comes together in one single skillet.
One pan means big flavor, minimal cleanup, and dinner on the table faster than any delivery app. So go ahead and pull out that skillet — let’s make something amazing.
Why One Pan Makes All the Difference
First of all, one-pan meals are not just a convenience — they’re a cooking technique. When everything cooks in the same skillet, the flavors from the chicken, the caramelized teriyaki sauce, and the crispy fried rice all blend together in a way that just can’t happen when everything is cooked separately.
The leftover bits of sticky sauce at the bottom of the pan get absorbed directly into the rice, creating layers of flavor in every single bite.
On top of that, cleanup is nearly effortless. Instead of juggling multiple pots, pans, and colanders, you’re washing one skillet and calling it a night. Furthermore, because everything is cooked in sequence — chicken first, then eggs, then rice, then sauce — each component contributes something to the pan before the next one goes in. That’s how you build a fried rice that’s deeply flavorful rather than just “rice with stuff in it.”
The Golden Rule: Use Day-Old Rice
Before diving into the ingredients, there’s one thing worth talking about — the rice. Day-old rice is the absolute non-negotiable secret behind every great fried rice dish. Fresh, warm rice is too moist and too soft. It clumps together in the pan and steams instead of frying, which gives you mushy fried rice.
Cold, day-old rice has dried out just enough so the grains separate easily and fry up beautifully in the hot skillet. So plan ahead and cook your rice the night before, spread it on a sheet pan, let it cool completely, and refrigerate it uncovered overnight. You’ll be so glad you did.
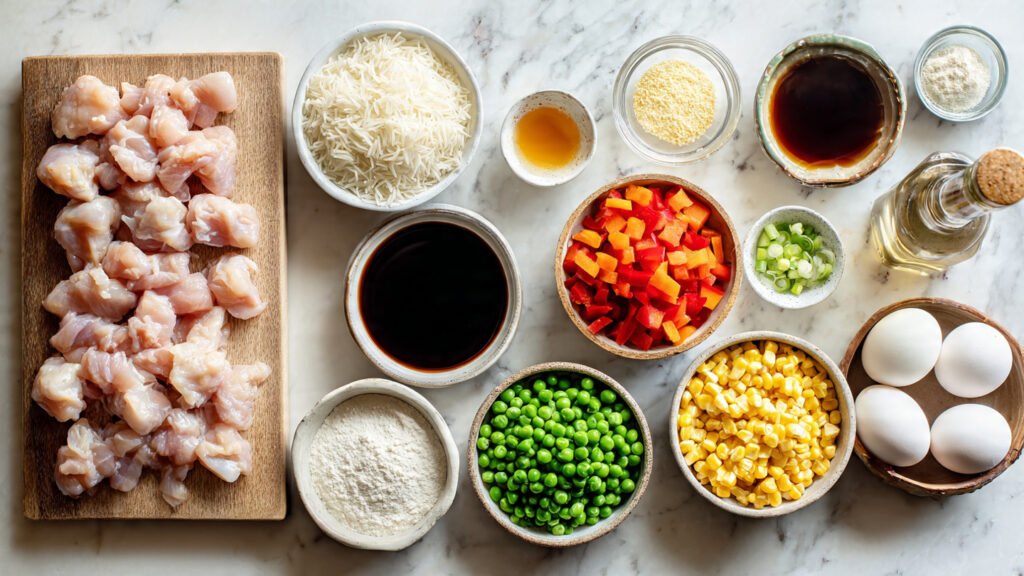
Ingredients
For the Teriyaki Chicken:
- 1½ lbs boneless, skinless chicken thighs, cut into ¾-inch pieces
- 2 tablespoons cornstarch (for coating — creates a crispy crust that holds the glaze)
- ½ teaspoon salt
- ¼ teaspoon black pepper
- 1 tablespoon vegetable oil or avocado oil
For the Sticky Teriyaki Sauce:
- ¼ cup low-sodium soy sauce
- 3 tablespoons honey
- 2 tablespoons dark brown sugar
- 1 tablespoon mirin (found in the Asian aisle at most US grocery stores)
- 1 tablespoon apple cider vinegar
- 2 cloves garlic, minced
- 1 teaspoon fresh ginger, grated
- 1 tablespoon cornstarch + 2 tablespoons cold water (slurry for thickening)
- 1 teaspoon sesame oil (added at the very end)
For the Fried Rice:
- 3 cups day-old cooked jasmine rice (cold from the fridge)
- 2 large eggs, lightly beaten
- 1 tablespoon vegetable oil (for the rice)
- ½ cup frozen peas and carrots, thawed
- ½ cup corn kernels (canned or frozen, drained)
- ½ cup diced red bell pepper
- 3 green onions (scallions), sliced — whites and greens separated
- 2 tablespoons low-sodium soy sauce (to season the rice)
Toppings:
- 1 teaspoon toasted sesame seeds
- Sliced green onion tops (reserved from above)
- Optional: drizzle of sriracha for heat
Step-by-Step Instructions
Step 1 – Mix the Teriyaki Sauce
To begin, whisk together the soy sauce, honey, dark brown sugar, mirin, apple cider vinegar, garlic, and ginger in a small bowl until the sugar is fully dissolved. Then, in a separate tiny bowl, stir the cornstarch and cold water together until you get a smooth, lump-free slurry, and stir it into the sauce. Set it aside — it goes in at the right moment, and not a second before.
Step 2 – Cook the Chicken
Next, pat the chicken pieces dry with paper towels, season with salt and pepper, and toss them in the cornstarch until lightly coated on all sides. Heat one tablespoon of vegetable oil in a large 12-inch skillet or wok over medium-high heat until it’s shimmering hot. Add the chicken in a single layer and cook undisturbed for 3 minutes on the first side. Flip and cook for another 2 to 3 minutes until golden brown and fully cooked through.
Step 3 – Add the Sauce to the Chicken
Once the chicken is cooked, pour the teriyaki sauce directly into the skillet over the chicken. It will immediately begin bubbling. Toss everything together and let the sauce simmer for 2 to 3 minutes, stirring constantly, until it thickens into a glossy, sticky glaze that clings to every piece. Now, transfer the glazed chicken to a plate and set it aside — you’ll add it back in at the very end so it stays sticky and juicy.
Step 4 – Scramble the Eggs
In that same skillet — no need to wash it — add just a tiny drizzle of oil if needed. Pour in the beaten eggs and let them cook for about 30 seconds undisturbed. Then gently scramble them with a spatula until they’re just barely set and still slightly moist. Transfer the eggs to the same plate as the chicken. Don’t overcook them here — they’ll finish cooking when everything comes back together at the end.
Step 5 – Fry the Rice
Now comes the most satisfying part of this whole recipe. Add another tablespoon of oil to the skillet and crank the heat up to high. Add the cold day-old rice and press it firmly down against the hot surface of the pan with a spatula. Let it sit undisturbed for about 2 full minutes — you’ll hear it sizzling and crackling. That’s exactly what you want. That’s the rice building up a lightly crispy bottom layer that gives this dish its incredible texture.
Step 6 – Add the Veggies
After the rice has crisped up on the bottom, toss in the scallion whites, peas and carrots, corn, and diced red bell pepper. Stir everything together and stir-fry for 2 to 3 minutes until the vegetables are just tender. Then drizzle the 2 tablespoons of soy sauce directly over the rice and toss to distribute the seasoning evenly throughout. Everything in the pan should be coated in a light, savory glaze at this point.
Step 7 – Bring It All Together
Finally, add the glazed chicken and scrambled eggs back into the skillet. Toss everything together gently so the rice, chicken, eggs, and vegetables all combine without breaking up the eggs too much. Drizzle the sesame oil over the top and give it one final toss. Remove from heat, taste and adjust seasoning, and top with sesame seeds and sliced scallion greens. Serve directly from the skillet — because one pan deserves all the glory.
Pro Tips for Perfect One-Pan Fried Rice
- Cold rice is king: Warm or freshly cooked rice will turn mushy in the pan. Always use rice that’s been refrigerated overnight — the drier it is, the crispier and better it fries.
- High heat the whole way through: Fried rice needs aggressive heat to develop those smoky, slightly charred “wok-hei” flavor notes. Don’t be shy about cranking the burner up.
- Don’t crowd the pan: Use at least a 12-inch skillet. A crowded pan creates steam instead of a sear, and that kills the crispiness of the rice.
- Cook in stages: Each component — chicken, eggs, rice, veggies — gets its own moment in the pan. This is the key to a fried rice where every element tastes properly cooked instead of a scrambled mess.
- The sesame oil goes last: Adding sesame oil to a ripping hot pan destroys its flavor. Always drizzle it in at the very end as a finishing oil for that signature nutty aroma.
Recipe FAQs
Why is day-old rice so important for this recipe?
Freshly cooked rice holds too much moisture, which causes it to steam and clump in the hot skillet instead of frying. Day-old rice that’s been refrigerated overnight is drier and firmer, so it separates easily and develops that slightly crispy texture that makes fried rice so good.
Can I use chicken breasts instead of thighs?
Absolutely. Chicken breasts are leaner and work great here — just cut them into small, even pieces so they cook quickly and evenly. Be careful not to overcook them since breasts dry out faster than thighs.
Can I add other vegetables?
Definitely. Broccoli, snap peas, edamame, shredded cabbage, zucchini, mushrooms, or even pineapple all work beautifully in this fried rice. Just make sure any larger vegetables are cut small enough to cook through during the stir-fry phase.
How do I store and reheat leftovers?
Store leftovers in an airtight container in the refrigerator for up to 4 days. To reheat, add a tablespoon of water and microwave covered for 1½ to 2 minutes, or toss in a hot skillet for 3 to 4 minutes to re-crisp the rice.
Can I use instant or microwavable rice instead of day-old rice?
You can in a pinch, but spread the cooked rice on a sheet pan and refrigerate it for at least an hour before using it. The goal is to remove as much moisture as possible before it hits the hot pan.
One-Pan Sticky Teriyaki Chicken Fried Rice Recipe Card
One-Pan Sticky Teriyaki Chicken Fried Rice Recipes
Ingredients
For the Teriyaki Chicken:
- 1½ lbs boneless skinless chicken thighs, cut into ¾-inch pieces
- 2 tablespoons cornstarch for coating — creates a crispy crust that holds the glaze
- ½ teaspoon salt
- ¼ teaspoon black pepper
- 1 tablespoon vegetable oil or avocado oil
- For the Sticky Teriyaki Sauce:
- ¼ cup low-sodium soy sauce
- 3 tablespoons honey
- 2 tablespoons dark brown sugar
- 1 tablespoon mirin found in the Asian aisle at most US grocery stores
- 1 tablespoon apple cider vinegar
- 2 cloves garlic minced
- 1 teaspoon fresh ginger grated
- 1 tablespoon cornstarch + 2 tablespoons cold water slurry for thickening
- 1 teaspoon sesame oil added at the very end
For the Fried Rice:
- 3 cups day-old cooked jasmine rice cold from the fridge
- 2 large eggs lightly beaten
- 1 tablespoon vegetable oil for the rice
- ½ cup frozen peas and carrots thawed
- ½ cup corn kernels canned or frozen, drained
- ½ cup diced red bell pepper
- 3 green onions scallions, sliced — whites and greens separated
- 2 tablespoons low-sodium soy sauce to season the rice
Toppings:
- 1 teaspoon toasted sesame seeds
- Sliced green onion tops reserved from above
- Optional: drizzle of sriracha for heat
Instructions
Step 1 – Mix the Teriyaki Sauce
- To begin, whisk together the soy sauce, honey, dark brown sugar, mirin, apple cider vinegar, garlic, and ginger in a small bowl until the sugar is fully dissolved. Then, in a separate tiny bowl, stir the cornstarch and cold water together until you get a smooth, lump-free slurry, and stir it into the sauce. Set it aside — it goes in at the right moment, and not a second before.
Step 2 – Cook the Chicken
- Next, pat the chicken pieces dry with paper towels, season with salt and pepper, and toss them in the cornstarch until lightly coated on all sides. Heat one tablespoon of vegetable oil in a large 12-inch skillet or wok over medium-high heat until it’s shimmering hot. Add the chicken in a single layer and cook undisturbed for 3 minutes on the first side. Flip and cook for another 2 to 3 minutes until golden brown and fully cooked through.
Step 3 – Add the Sauce to the Chicken
- Once the chicken is cooked, pour the teriyaki sauce directly into the skillet over the chicken. It will immediately begin bubbling. Toss everything together and let the sauce simmer for 2 to 3 minutes, stirring constantly, until it thickens into a glossy, sticky glaze that clings to every piece. Now, transfer the glazed chicken to a plate and set it aside — you’ll add it back in at the very end so it stays sticky and juicy.
Step 4 – Scramble the Eggs
- In that same skillet — no need to wash it — add just a tiny drizzle of oil if needed. Pour in the beaten eggs and let them cook for about 30 seconds undisturbed. Then gently scramble them with a spatula until they’re just barely set and still slightly moist. Transfer the eggs to the same plate as the chicken. Don’t overcook them here — they’ll finish cooking when everything comes back together at the end.
Step 5 – Fry the Rice
- Now comes the most satisfying part of this whole recipe. Add another tablespoon of oil to the skillet and crank the heat up to high. Add the cold day-old rice and press it firmly down against the hot surface of the pan with a spatula. Let it sit undisturbed for about 2 full minutes — you’ll hear it sizzling and crackling. That’s exactly what you want. That’s the rice building up a lightly crispy bottom layer that gives this dish its incredible texture.
Step 6 – Add the Veggies
- After the rice has crisped up on the bottom, toss in the scallion whites, peas and carrots, corn, and diced red bell pepper. Stir everything together and stir-fry for 2 to 3 minutes until the vegetables are just tender. Then drizzle the 2 tablespoons of soy sauce directly over the rice and toss to distribute the seasoning evenly throughout. Everything in the pan should be coated in a light, savory glaze at this point.
Step 7 – Bring It All Together
- Finally, add the glazed chicken and scrambled eggs back into the skillet. Toss everything together gently so the rice, chicken, eggs, and vegetables all combine without breaking up the eggs too much. Drizzle the sesame oil over the top and give it one final toss. Remove from heat, taste and adjust seasoning, and top with sesame seeds and sliced scallion greens. Serve directly from the skillet — because one pan deserves all the glory.